Getting Started on Slurm#
Note
Slurm support is under active development. We’d love to hear from you — please fill out this form.
Quickstart#
Have SSH access to a Slurm cluster? Get started with SkyPilot in 3 steps:
# 1. Configure your Slurm cluster in ~/.slurm/config
$ mkdir -p ~/.slurm && cat > ~/.slurm/config << EOF
Host mycluster
    HostName login.mycluster1.myorg.com
    User myusername
    IdentityFile ~/.ssh/id_rsa
EOF

# 2. Verify SkyPilot detects your Slurm cluster
$ sky check
# Shows "Slurm: enabled"

# 3. Launch your first SkyPilot task
$ sky launch --gpus H100:1 -- nvidia-smi
For detailed instructions, prerequisites, and advanced features, read on.
Prerequisites#
To connect and use a Slurm cluster, SkyPilot needs SSH access to the Slurm login node (where you can run sbatch, squeue, etc.).
In a typical workflow:
A cluster administrator sets up a Slurm cluster and provides users with SSH access to the login node.
Users configure the
~/.slurm/configfile with connection details for their Slurm cluster(s). SkyPilot reads this configuration file to communicate with the cluster(s).
Configuring Slurm clusters#
SkyPilot uses an SSH config-style file at ~/.slurm/config to connect to Slurm clusters.
Each host entry in this file represents a Slurm cluster.
Create the configuration file:
$ mkdir -p ~/.slurm

$ cat > ~/.slurm/config << EOF
# Example Slurm cluster configuration
Host mycluster1
    HostName login.mycluster1.myorg.com
    User myusername
    IdentityFile ~/.ssh/id_rsa
    # Optional: Port 22
    # Optional: ProxyJump jumphost
    # Optional: ProxyCommand ssh -W %h:%p jumphost

# Optional: Add more clusters if you have multiple Slurm clusters
Host mycluster2
    HostName login.mycluster2.myorg.com
    User myusername
    IdentityFile ~/.ssh/id_rsa
EOF
Note
HostName and User are required fields. IdentityFile is optional;
if not specified, SSH will use keys from ssh-agent or default key locations
(e.g., ~/.ssh/id_rsa, ~/.ssh/id_ed25519).
Verify your SSH connection works by running:
$ ssh -F ~/.slurm/config <cluster_name> "sinfo"
Launching your first task#
Once you have configured your Slurm cluster:
Run
sky checkand verify that Slurm is enabled in SkyPilot.$ sky check Checking credentials to enable clouds for SkyPilot. ... Slurm: enabled Allowed clusters: ✔ mycluster1 ✔ mycluster2 ...
You can now run any SkyPilot task on your Slurm cluster.
$ sky launch --cpus 2 task.yaml
== Optimizer ==
Target: minimizing cost
Estimated cost: $0.0 / hour

Considered resources (1 node):
---------------------------------------------------------------------------------------------------
 INFRA                   INSTANCE          vCPUs   Mem(GB)   GPUS     COST ($)   CHOSEN
---------------------------------------------------------------------------------------------------
 Slurm (mycluster1)      -                 2       4         -        0.00          ✔
 Slurm (mycluster2)      -                 2       4         -        0.00
 Kubernetes (myk8s)      -                 2       4         -        0.00
 AWS (us-east-1)         m6i.large         2       8         -        0.10
 GCP (us-central1-a)     n2-standard-2     2       8         -        0.10
---------------------------------------------------------------------------------------------------
SkyPilot will submit a job to your Slurm cluster using
sbatch.To run on a specific Slurm cluster or partition, use the
--infraflag:$ sky launch --infra slurm/mycluster/mypartition task.yaml
Viewing cluster status#
To view the status of your SkyPilot clusters on Slurm:
$ sky status
NAME         LAUNCHED    RESOURCES                    STATUS   AUTOSTOP  COMMAND
my-task      10 mins ago Slurm(mycluster1, 2CPU--4GB) UP       -         sky launch...
To terminate a cluster (cancels the underlying Slurm job):
$ sky down my-task
Using GPUs#
To request GPUs on your Slurm cluster, specify the accelerator in your task YAML:
# task.yaml
resources:
  accelerators: H200:1

run: |
  nvidia-smi
Or via the command line:
$ sky launch --gpus H200:1 -- nvidia-smi
SkyPilot will translate this to the appropriate --gres=gpu: directive for Slurm.
Note
The GPU type name should match what’s configured in your Slurm cluster’s GRES configuration.
Common names include H100, H200, L4 etc.
Viewing GPU availability#
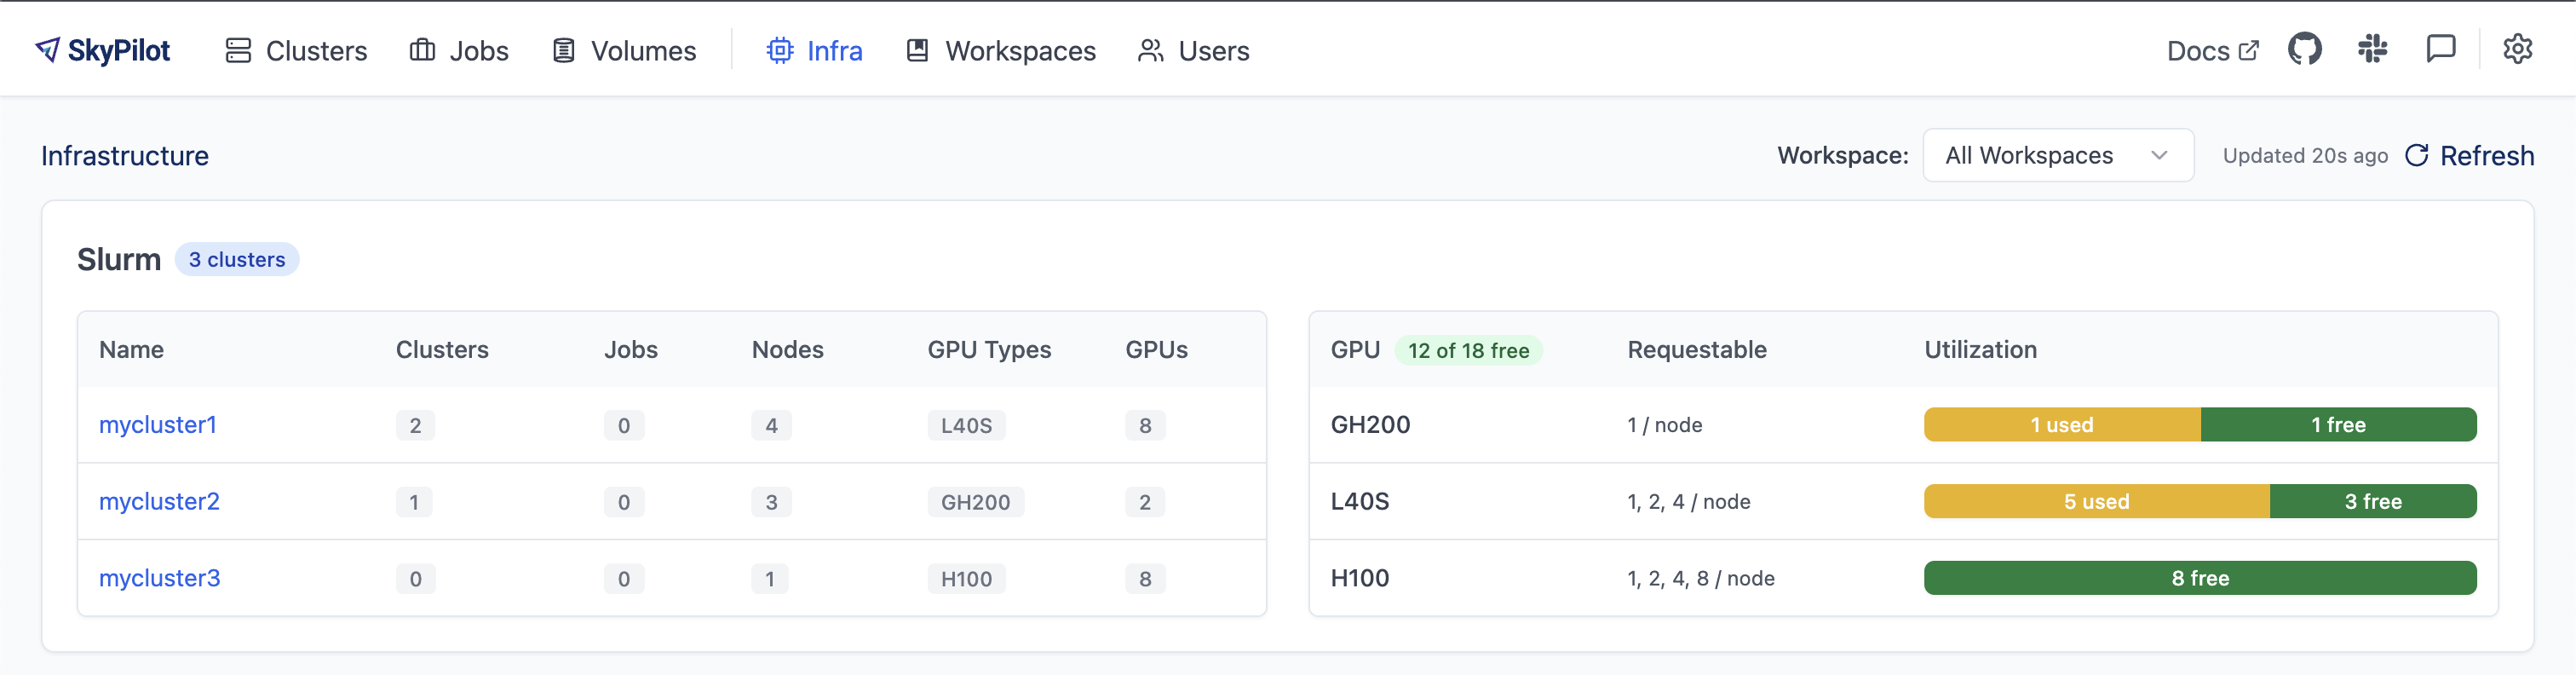
SkyPilot provides a unified dashboard to monitor GPU availability and utilization across all your Slurm clusters.
To open the dashboard:
$ sky dashboard
Navigate to the Infra tab to see the real-time GPU availability across all your Slurm clusters:
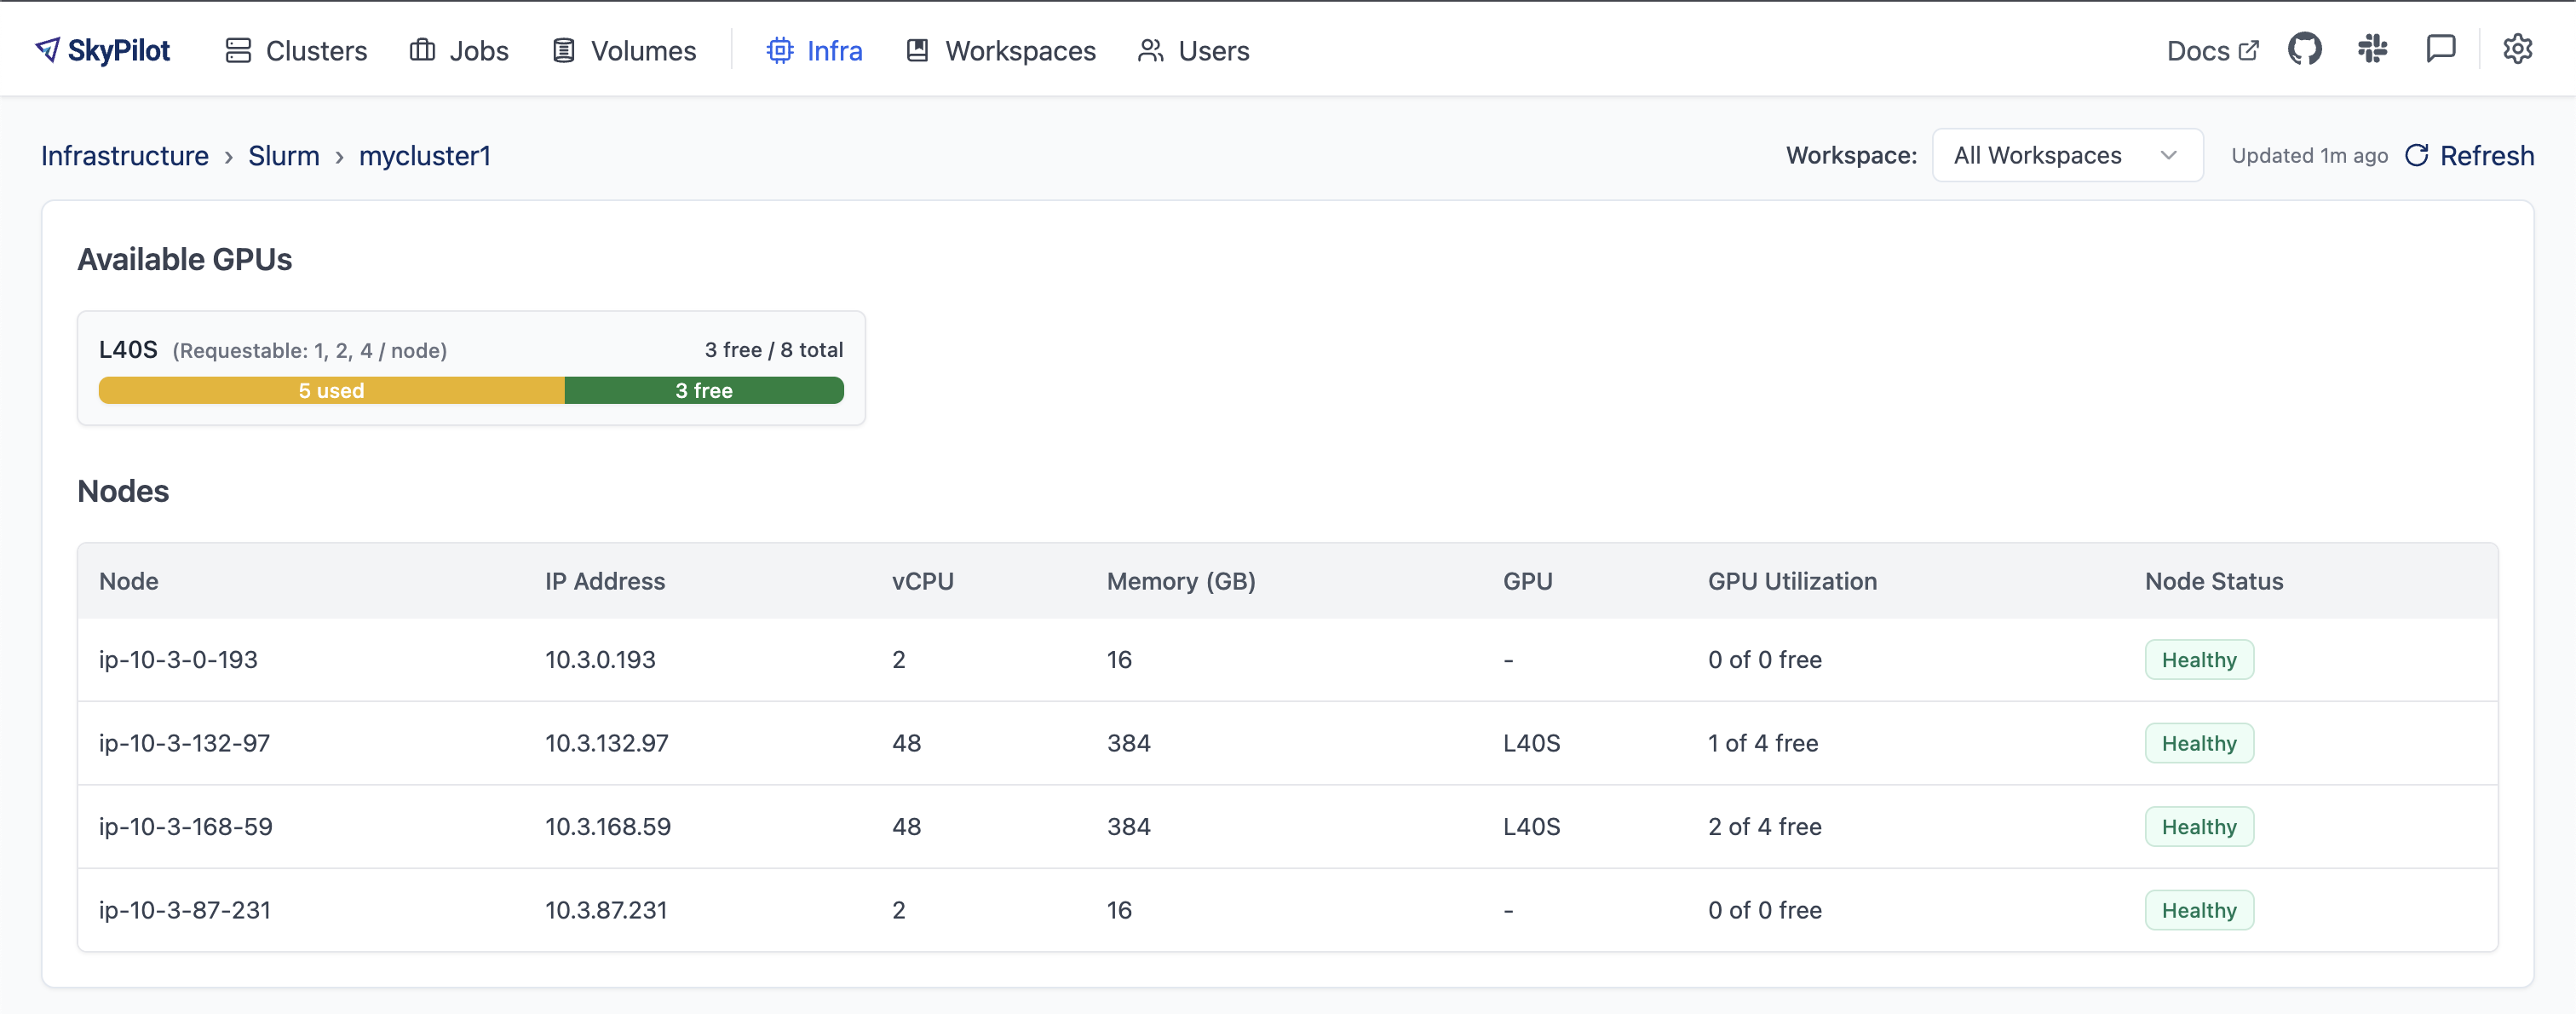
Click on a cluster name to see detailed GPU availability per node:
You can also view GPU availability from the CLI:
$ sky gpus list --infra slurm
Slurm GPUs
GPU    UTILIZATION
L40S   3 of 8 free
GH200  1 of 2 free
H100   8 of 8 free

Slurm Cluster: mycluster1
GPU   REQUESTABLE_QTY_PER_NODE  UTILIZATION
L40S  1, 2, 4                   3 of 8 free

Slurm Cluster: mycluster2
GPU    REQUESTABLE_QTY_PER_NODE  UTILIZATION
GH200  1                         1 of 2 free

Slurm Cluster: mycluster3
GPU   REQUESTABLE_QTY_PER_NODE  UTILIZATION
H100  1, 2, 4, 8                8 of 8 free

Slurm per node GPU availability
CLUSTER     NODE            PARTITION  STATE  GPU   UTILIZATION
mycluster1  ip-10-3-132-97  dev*,gpus  mix    L40S  1 of 4 free
mycluster1  ip-10-3-168-59  dev*,gpus  mix    L40S  2 of 4 free
...
Configuring allowed clusters#
By default, SkyPilot will use all clusters defined in ~/.slurm/config.
To restrict which clusters SkyPilot can use, add the following to your ~/.sky/config.yaml:
slurm:
  allowed_clusters:
    - mycluster1
    - mycluster2
Configuring pricing#
By default, Slurm virtual instance types report a cost of $0.00 in
sky launch, sky status, and sky gpus list.
To display meaningful cost estimates, add hourly rates in your
~/.sky/config.yaml:
slurm:
  pricing:
    cpu: 0.04        # $/vCPU/hr  (CPU-only instances)
    memory: 0.01     # $/GB/hr    (CPU-only instances)
    accelerators:
      V100: 2.50     # $/accelerator/hr (all-in, includes cpu/memory)
      A100: 3.50
Pricing uses two mutually exclusive tiers: CPU-only instances (no
accelerator) use the cpu and memory rates, while accelerator
instances use only the per-accelerator rate (an all-in price that includes
cpu and memory). All fields are optional; unset fields contribute $0.00.
You can also set different pricing per cluster and per partition using
cluster_configs. Each level deep-merges with the parent — only the keys you
specify are overridden:
slurm:
  pricing:
    cpu: 0.04
    memory: 0.01
    accelerators:
      V100: 2.50
  cluster_configs:
    mycluster1:
      pricing:
        cpu: 0.06  # overrides; memory and accelerators inherited
See slurm.pricing and slurm.cluster_configs in the advanced configuration reference for the full example with partition-level overrides.
Containers#
SkyPilot supports running tasks inside container images on Slurm, using Pyxis and enroot under the hood.
To use a container image, specify image_id in your task YAML or use the
--image-id CLI flag:
# task.yaml
resources:
  image_id: docker:ubuntu:22.04

run: |
  echo "Running inside container"
  cat /etc/os-release
# Or via CLI
$ sky launch --image-id docker:ubuntu:22.04 -- echo "hello from container"
Images from any Docker-compatible registry are supported, including but not limited to Docker Hub, AWS ECR, GCP Artifact Registry, and NVIDIA NGC.
Note
Container support requires the Pyxis SPANK plugin to be installed on your Slurm cluster.
Private registries#
Note
Unlike cloud VMs and
Kubernetes, private registry
authentication on Slurm is configured at the cluster level by the
administrator. Users do not need to set SKYPILOT_DOCKER_* environment
variables.
To pull images from private registries, the cluster administrator must configure enroot’s credentials file on all compute nodes. Enroot uses a netrc format credentials file to authenticate with container registries. For more details, see the enroot import documentation.
Step 1: Find the credentials file path
The credentials file location depends on your cluster’s enroot configuration:
# Check the configured ENROOT_CONFIG_PATH
$ grep ENROOT_CONFIG_PATH /etc/enroot/enroot.conf

# If ENROOT_CONFIG_PATH is set (e.g., ${HOME}/enroot):
#   Credentials file: ~/enroot/.credentials
# If unset (default):
#   Credentials file: ~/.config/enroot/.credentials
Step 2: Create the credentials file on all compute nodes
Since most Slurm clusters use a shared filesystem (e.g., NFS, Lustre), creating the file in the user’s home directory typically makes it available on all nodes:
Docker Hub authentication requires credentials for both the registry and the auth server:
$ mkdir -p <ENROOT_CONFIG_PATH>
$ cat > <ENROOT_CONFIG_PATH>/.credentials << 'EOF'
machine auth.docker.io login <username> password <access-token>
machine registry-1.docker.io login <username> password <access-token>
EOF
Use a personal access token with “Read” repository permissions as the password.
# Replace <ENROOT_CONFIG_PATH> with the path from Step 1
$ mkdir -p <ENROOT_CONFIG_PATH>
$ cat > <ENROOT_CONFIG_PATH>/.credentials << 'EOF'
machine <account-id>.dkr.ecr.<region>.amazonaws.com login AWS password $(aws ecr get-login-password --region <region>)
EOF
The $(...) syntax is evaluated by enroot at import time, so the
ECR token (which expires every 12 hours) is always refreshed
automatically.
Requirements:
AWS CLI must be installed on compute nodes
IAM credentials with
ecr:GetAuthorizationToken,ecr:BatchGetImage, andecr:GetDownloadUrlForLayerpermissionsenroot >= 4.0 is required for ECR. Older versions do not support ECR’s non-standard authentication flow. If you see
[ERROR] Could not process JSON inputwhen pulling ECR images, upgrade enroot to 4.0 or later. See enroot issues #143 and #189 for details.
The service account key must be base64-encoded because raw JSON contains characters that break enroot’s netrc parser:
$ mkdir -p <ENROOT_CONFIG_PATH>
$ cat > <ENROOT_CONFIG_PATH>/.credentials << 'EOF'
machine <location>-docker.pkg.dev login _json_key_base64 password $(base64 -w0 /path/to/service-account-key.json)
EOF
The service account must have the roles/artifactregistry.reader
role. See Artifact Registry authentication.
Replace <location> with your repository’s location (e.g., us,
us-central1, europe-west1).
$ mkdir -p <ENROOT_CONFIG_PATH>
$ cat > <ENROOT_CONFIG_PATH>/.credentials << 'EOF'
machine nvcr.io login $oauthtoken password <NGC_API_KEY>
EOF
Step 3: Verify the setup
Test that enroot can pull the private image on a compute node:
$ srun enroot import --output /tmp/test.sqsh 'docker://<registry>#<image>:<tag>'
# Should succeed without authentication errors

# Clean up
$ rm /tmp/test.sqsh
Once configured, users can launch SkyPilot tasks with private images without any additional setup.
Current limitations#
Slurm support in SkyPilot is under active development. The following features are not yet supported:
Autostop: Slurm clusters cannot be automatically terminated after idle time.
SkyServe: Serving deployments on Slurm is not yet supported.
FAQs#
How does SkyPilot interact with Slurm?
Each SkyPilot “cluster” corresponds to a Slurm job. When you run
sky launch, SkyPilot creates an sbatch script that requests the specified resources and runs a long-lived process with the SkyPilot runtime.SkyPilot uses slurm CLI commands on the login node to interact with the cluster. It submits jobs using
sbatch, views the status of jobs usingsqueue, and terminates jobs usingscancel.Which user are jobs submitted as?
Jobs are submitted using your own Slurm username (the
Userspecified in your~/.slurm/config). This means your jobs appear under your username insqueue, count against your quotas, and respect your existing permissions.Can I use multiple Slurm clusters?
Yes. Add multiple host entries to your
~/.slurm/configfile. Each host will appear as a separate region in SkyPilot’s optimizer.What partition does SkyPilot use?
By default, SkyPilot uses the default partition configured in your Slurm cluster. To specify a partition, use the
--infraflag:$ sky launch --infra slurm/mycluster/mypartition task.yaml
Can SkyPilot provision a Slurm cluster for me?
No. SkyPilot runs tasks on existing Slurm clusters. It does not provision new Slurm clusters or add nodes to existing clusters.